ESP32 Arduino Setup: Difference between revisions
No edit summary |
No edit summary |
||
| Line 31: | Line 31: | ||
<pre>https://dl.espressif.com/dl/package_esp32_index.json</pre> | <pre>https://dl.espressif.com/dl/package_esp32_index.json</pre> | ||
[[File:Arduino board url.png|500px|frame|none|alt=Screenshot of the popup window for adding board urls|Screenshot of the popup window for adding board urls ]] | [[File:Arduino board url.png|500px|frame|none|alt=Screenshot of the popup window for adding board urls|Screenshot of the popup window for adding board urls ]] | ||
Optional: | Optional: | ||
* Change the compilation and upload process display mode to ‘verbose mode’ | * Change the compilation and upload process display mode to ‘verbose mode’ | ||
| Line 86: | Line 87: | ||
** On linux it will be called /dev/ttyUSB* where * is a number, ie /dev/ttyUSB0 | ** On linux it will be called /dev/ttyUSB* where * is a number, ie /dev/ttyUSB0 | ||
** On MacOS it will be called /dev/cu.SLAB_USBtoUART as shown in the picture below.[[File:Arduino-esp32-comm.png|500px|frame|none|alt=screenshot of Arduino window with menu Tools-Port-SLAB_USBtoUART selected|screenshot of Arduino window with menu Tools-Port-SLAB_USBtoUART selected]] | ** On MacOS it will be called /dev/cu.SLAB_USBtoUART as shown in the picture below.[[File:Arduino-esp32-comm.png|500px|frame|none|alt=screenshot of Arduino window with menu Tools-Port-SLAB_USBtoUART selected|screenshot of Arduino window with menu Tools-Port-SLAB_USBtoUART selected]] | ||
== Install libraries == | |||
These are all optional depending on the workshop your following. | |||
=== ESPAsyncWebServer === | |||
# [https://github.com/me-no-dev/ESPAsyncWebServer/archive/refs/heads/master.zip Download the code] | |||
# Unzip the downloaded file. | |||
# Remove the "-master" part from the unzipped directory name, so <code>ESPAsyncWebServer-master</code> should now be called <code>ESPAsyncWebServer</code> | |||
# Move the renamed directory to your library directory: | |||
* On Windows: <code>My Documents\Arduino\libraries</code> | |||
* On Linux: <code>{sketchbook folder}/libraries</code>. The sketchbook folder location can be found (or changed) at File > Preferences > Sketchbook location:. This is the location of libraries installed via Library Manager (Sketch > Include Library > Manage Libraries…) or Sketch > Include Library > Add .ZIP Library. You should also manually install libraries to that location. | |||
* On MacOS: <code>~/Documents/Arduino/libraries</code> | |||
=== AsyncTCP === | |||
Much the same as above: | |||
# [https://github.com/me-no-dev/AsyncTCP/archive/refs/heads/master.zip Download the code] | |||
# Unzip the downloaded file. | |||
# Remove the "-master" part from the unzipped directory name, so <code>AsyncTCP-master</code> should now be called <code>AsyncTCP</code> | |||
# Move the renamed directory to your library directory (See above). | |||
''Restart the IDE after installation.'' | |||
== Confirming code compilation == | == Confirming code compilation == | ||
* Restart the Arduino IDE (the Arduino software) | * Restart the Arduino IDE (the Arduino software) | ||
* | * Create a new sketch. | ||
* Copy/paste the following code. This code does nothing, but if it compiles and upload without errors we know that everything is installed correctly. | |||
<syntaxhighlight lang="c"> | |||
#include <WiFi.h> | |||
#include <AsyncTCP.h> | |||
#include <ESPAsyncWebServer.h> | |||
void setup() { | |||
} | |||
void loop() { | |||
} | |||
</syntaxhighlight> | |||
* Select the ESP32 Dev Module board | * Select the ESP32 Dev Module board | ||
[[File:Arduino-wifizine-select-board.png|500px|frame|none|alt=Screenshot of Arduino menu open at > Tools > Board > ESP32 Dev Module|Screenshot of Arduino menu open at > Tools > Board > ESP32 Dev Module]] | |||
== '''Compile''' == | |||
= | Click on the compile button in the top left of the editor (see red arrow in pic beneath) | ||
[[File:Arduino-wifizine-popup.png|500px|frame|none|alt=arduino window with red arrow pointing to the compile button on the top left|Arduino window with red arrow pointing to the compile button on the top left]] | |||
* '''If the compilation process is successful, it will say “DONE COMPILING” at the bottom''' | |||
* This means Arduino confirms it can find everything it needs to upload working code | |||
* Don’t upload the code to the board yet, first we need some more stuff | |||
[[File:./images/arduino-wifizine-compile-done.png|arduino-wifizine-compile-done]] | |||
''Screenshot of Arduino window with “done compiling” message in the bottom bar of the window'' | |||
* '''If the compilation process ends abnormally, it will give an orange error''' | |||
* If necessary, troubleshoot using the error messages (if you don’t get any, check that “verbose” is checked in settings of Arduino. | |||
<img src="./images/arduino-wifizine-compile-failed.png" alt="Arduino window with an orange error message" width="350"/> | |||
=== Upload to the Board === | === Upload to the Board === | ||
Revision as of 21:54, 26 October 2022
[work in progress]
Arduino IDE setup for ESP32
This guide walks you through setting up the Arduino IDE for use with ESP32 devkit v1 module as well as installation of the libraries we most use during H&D workshops. The instructions are for Arduino IDE version 1.x, but should mostly make sense for version 2.x as well.
Installation
Download IDE
First, download the Arduino IDE.
- Download the Arduino software here: Arduino Download.
Pick the installer appropriate for your system.
If necessary you can follow one of these guides:
Install ESP32 Boards
Next we need to install an extension that makes it possible to program the ESP32 modules from the Arduino IDE.
Arduino IDE settings Open the Arduino Setting by going to: - Windows/Linux: Menu > File > Preferences... - MacOS: Menu > Arduino > Preferences...
- Copy and paste the following into ‘Additional Boards Manager URLs’ and click ‘Ok’.
https://dl.espressif.com/dl/package_esp32_index.json

Optional:
- Change the compilation and upload process display mode to ‘verbose mode’
- Check ‘compile’ and ‘upload’ in ‘Show verbose output during:’
Launch the Board Manager Go to the menu Tools > Boards > Board manager...


Type ‘esp32’ in the search box and click ‘Install’

Install drivers
For your computer to be able to communicate with the ESP32 board you need device drivers. If you have already installed the SiLabs driver you can skip this step. If you're unsure, check the step Check if the USB driver are working below.
Installing a USB device driver to communicate with the ESP32 module (chip name: SiliconLabs CP2012)
Linux 3.x.x & 4.x.x
- Driver installation not required (included in kernel)
Linux 2.6.x
Linux 2.6.x - No information
Windows
Mac OS
- Check if you already have this driver installed by searching your machine for a file named “SiLabsUSBDriver.kext” AND/OR “SiLabsUSBDriverYos.kext” AND/OR “SiLabsUSBDriver64.kext”. On a Mac, they can be in either of these folders listed below, depending on your system. If you find nothing, proceed to install. Otherwise, uninstall using the uninstaller provided, before re-installing (drag the uninstall.sh file into a terminal window and hit enter to uninstall.
- /Library/Extensions/SiLabsUSBDriver.kext
- /Library/Extensions/SiLabsUSBDriverYos.kext
- /System/Library/Extensions/SiLabsUSBDriver64.kext
- /System/Library/Extensions/SiLabsUSBDriver.kext
- Download the driver: Silabs USB communication chip driver download
- Doubleclick “Install CP210x VCP Driver.app” to install it.
- When it gives a security message, follow the instructions to allow the install to continue
Check if the USB driver are working
- If you just installed the driver, restart your computer.
- For Mac OS users: after restarting, make sure GateKeeper does not interfere with driver loading.
- If you have problems, please check out this MacOS troubleshooting page.
- If communication is possible, you should be able to select the port under: Menu > Tools > Port > ...
The name of the port may vary depending on your operating system.
- On Windows it will probably called COM* where * is a number, ie. COM4.
- On linux it will be called /dev/ttyUSB* where * is a number, ie /dev/ttyUSB0
- On MacOS it will be called /dev/cu.SLAB_USBtoUART as shown in the picture below.
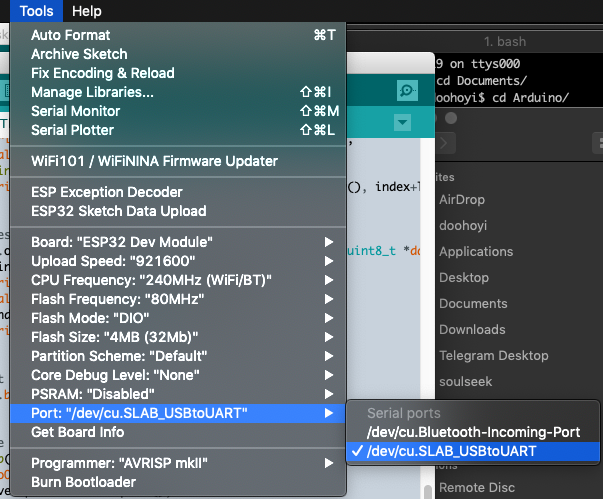 screenshot of Arduino window with menu Tools-Port-SLAB_USBtoUART selected

Install libraries
These are all optional depending on the workshop your following.
ESPAsyncWebServer
- Download the code
- Unzip the downloaded file.
- Remove the "-master" part from the unzipped directory name, so
ESPAsyncWebServer-mastershould now be calledESPAsyncWebServer - Move the renamed directory to your library directory:
- On Windows:
My Documents\Arduino\libraries - On Linux:
{sketchbook folder}/libraries. The sketchbook folder location can be found (or changed) at File > Preferences > Sketchbook location:. This is the location of libraries installed via Library Manager (Sketch > Include Library > Manage Libraries…) or Sketch > Include Library > Add .ZIP Library. You should also manually install libraries to that location. - On MacOS:
~/Documents/Arduino/libraries
AsyncTCP
Much the same as above:
- Download the code
- Unzip the downloaded file.
- Remove the "-master" part from the unzipped directory name, so
AsyncTCP-mastershould now be calledAsyncTCP - Move the renamed directory to your library directory (See above).
Restart the IDE after installation.
Confirming code compilation
- Restart the Arduino IDE (the Arduino software)
- Create a new sketch.
- Copy/paste the following code. This code does nothing, but if it compiles and upload without errors we know that everything is installed correctly.
#include <WiFi.h>
#include <AsyncTCP.h>
#include <ESPAsyncWebServer.h>

void setup() {
}

void loop() {
}
- Select the ESP32 Dev Module board

Compile
Click on the compile button in the top left of the editor (see red arrow in pic beneath)

- If the compilation process is successful, it will say “DONE COMPILING” at the bottom
- This means Arduino confirms it can find everything it needs to upload working code
- Don’t upload the code to the board yet, first we need some more stuff
[[File:./images/arduino-wifizine-compile-done.png|arduino-wifizine-compile-done]] Screenshot of Arduino window with “done compiling” message in the bottom bar of the window
- If the compilation process ends abnormally, it will give an orange error
- If necessary, troubleshoot using the error messages (if you don’t get any, check that “verbose” is checked in settings of Arduino.
<img src="./images/arduino-wifizine-compile-failed.png" alt="Arduino window with an orange error message" width="350"/>
Upload to the Board
Click on the Upload button (arrow pointing right on top of the Arduino window), and then while the text ‘Connecting …’ displays in the control window at the bottom of the screen, press and hold the’ BOOT ’button on the ESP board for one second.
<img src="./images/arduino-connecting.png" alt="when the output window in Arduino says CONNECTING, push the boot button on the board" width="650"/>
If the upload was successful, you will see this screen:
<img src="./images/arduino-wifizine-upload-done.png" alt="output window in Arduino stating Leaving...Hard resetting via RTS pin...." width="450"/>
If the upload was unsuccessful, you will see this error
[[./images/arduino-wifizine-upload-failed.png|[[File:./images/arduino-wifizine-upload-failed.png|arduino window with an orange error message]]]]
Mac OS Monterey issue during upload
If you’re using Mac OS Monterey, you might get an error like this in the Arduino output window:
” exec: “python”: executable file not found in $PATH error on mac monterey ”
If that happens, open a Terminal window, and paste the code below to install the right version of Python in the right place. Then hit enter.
sed -i -e 's/=python /=python3 /g' ~/Library/Arduino15/packages/esp32/hardware/esp32/*/platform.txt
Now restart the Arduino application and try uploading the code to the board again.
Publishing your first mini webpage to the module
The content of the small webpage we will put on the wifi modules is stored separately from the running code that takes care of publishing it. Therefore, it goes through a separate process from the usual Arduino IDE code upload process. To do this, you need to install a separate extension plug-in.
Download and install the ESP32FS plug-in
Create a folder called ‘~/Documents/Arduino/tools’
[[./images/arduino-esp32fs-00002.png|[[File:./images/arduino-esp32fs-00002.png|Screenshot of finder window open at Arduino, showing subfolders tools]]]]
Copy unpacked ESP32FS into the subfolder tools
[[./images/arduino-esp32fs-00003.png|[[File:./images/arduino-esp32fs-00003.png|screenshot of finder window open at tools with subfolder ESP32FS inside it]]]]
Be mindful with the construction of the folders. It should be installed as shown in the following figure. (Note also that the folder name is ESP32FS!)
[[./images/arduino-esp32fs-00004.png|[[File:./images/arduino-esp32fs-00004.png|Screenshot of finder wiindow open at tools, showing filepath - ESP32FS - tool - esp32fs.jar]]]]
After restarting the Arduino IDE, verify that the plug-in installation was successful. If successful, you will see a menu called ‘ESP32 Sketch Data Upload’ added.
[[./images/arduino-esp32fs-00005.png|[[File:./images/arduino-esp32fs-00005.png|Screenshot of Arduino window with menu open at - Tools - ESP32 Sketch Data Upload]]]]
When you click this menu option, it will move all the files in the ‘~/Documents/Arduino/WifiZineThrowie/data’ folder to the ESP32 module’s web page store.
Changing the name of your wifi network
The arduino code (WifiZineThrowie.ino) specifies the name of your personal mini network by looking for a file in the data folder that ends with .ssid. In the files you downloaded you can see it is now called: “solarpunk-schat.ssid”. You can change this filename to the name you like for your network (avoid symbols to be sure). E.g. Clue1-Loes.
<img src="./images/ssid_name.png" alt="screenshot of finder window showing contents of the data folder, with the ssid file solarpunk-schat selected" width="450"/>
Uploading your website to the module
Then, in the Arduino software, go to > Tools and select > ESP32 Sketch Data Upload
[[./images/arduino-wifizine-webpage-upload.png|[[File:./images/arduino-wifizine-webpage-upload.png|screenshot of arduino software with the WifiZineThrowie sketch open and output window saying SPIFFS uploading image…]]]]
Please execute the upload. The color of the message output during upload is displayed in white instead of red.
While ‘Connecting …’ displays, press and hold the’ BOOT ’button on the ESP board for one second.
Screen when upload is completed successfully
[[./images/arduino-wifizine-webpage-upload-done.png|[[File:./images/arduino-wifizine-webpage-upload-done.png|Screenshot of arduino window stating SPIFFS image uploaded]]]]
Success! You can now find your private internet spot. Open the network settings on your phone, and select your network. Your website should pop up automatically, but some patience might help :)
Find your wifi network!
Look up the list of available networks on your phone with the name you provided to the .ssid file earlier. You should see your network popping up there. Try connecting to it. Your website should come up automatically with a pop-up window.
<img src="./images/login_network.png" alt="LEFT - screenshot of android phone open at wifi menu, showing all the available networkds, with network solarpunk-schat highlighted. RIGHT - screenshot of pop-up window displaying the website contents of the html file we made" width="650"/>
OPTIONAL STEPS
Adjust ESP32 Dev Module board settings
Look up the board settings under > Tools > Most of these settings are correct by default, you just have to change QIO to DIO
- Board: ESP32 Dev module
- Upload Speed : 921600
- CPU Frequency : 240MHz (WiFi BT)
- Flash Frequency : 80MHz
- Flash Mode : **DIO** (is QIO by default)
- Flash Size : 4MB (32Mb)
- Partition Scheme : Default
- Core Debug Level : None
- PSRAM : Disabled
<img src="./images/arduino-wifizine-config-board.png" alt="Screenshot of board settings under > Tools in Arduino window” width=“350”/>
Increasing the upload capacity of the board (at your own risk)
It is possible to increase the upload capacity of the board so you can make slightly bigger websites. This is documented by Doohoyi from Dianaband, but we haven’t tried it. Proceed at your own risk!
Dianaband’s workshop documentation
Acknowledgments
Is document is heavily based on the wonderful documentation of Dianaband: https://github.com/applecargo/WifiZineThrowie/blob/master/docs/index.md