ESP32 Arduino Setup
[work in progress]
Arduino IDE setup for ESP32
This guide walks you through setting up the legacy Arduino IDE for use with ESP32 devkit v1 module as well as installation of the libraries we most use during H&D workshops. The instructions are for Arduino IDE version 1.x, but should mostly make sense for version 2.x as well. The reason we're using the older version of the IDE is because there isn't any way in the new version to upload files to the ESP32 board.
This page only documents the installation of the ESP32 support for the Arduino IDE. Next steps may involve:
Installation
Download IDE
First, download the Legacy Arduino IDE.
- Download the Arduino software here: Arduino Download.
Pick the installer appropriate for your system.
If necessary you can follow one of these guides:
Install ESP32 Boards
Next we need to install an extension that makes it possible to program the ESP32 modules from the Arduino IDE.
Arduino IDE settings Open the Arduino Setting by going to: - Windows/Linux: Menu > File > Preferences... - MacOS: Menu > Arduino > Preferences...
- Copy and paste the following into ‘Additional Boards Manager URLs’ and click ‘Ok’.
https://dl.espressif.com/dl/package_esp32_index.json

Optional:
- Change the compilation and upload process display mode to ‘verbose mode’
- Check ‘compile’ and ‘upload’ in ‘Show verbose output during:’
Launch the Board Manager Go to the menu Tools > Boards > Board manager...


Type ‘esp32’ in the search box and click ‘Install’

Install drivers
For your computer to be able to communicate with the ESP32 board you need device drivers. If you have already installed the SiLabs driver you can skip this step. If you're unsure, check the step Check if the USB driver are working below.
Installing a USB device driver to communicate with the ESP32 module (chip name: SiliconLabs CP2012)
Linux 3.x.x & 4.x.x
- Driver installation not required (included in kernel)
Linux 2.6.x
Linux 2.6.x - No information
Windows
Mac OS
- Check if you already have this driver installed by searching your machine for a file named “SiLabsUSBDriver.kext” AND/OR “SiLabsUSBDriverYos.kext” AND/OR “SiLabsUSBDriver64.kext”. On a Mac, they can be in either of these folders listed below, depending on your system. If you find nothing, proceed to install. Otherwise, uninstall using the uninstaller provided, before re-installing (drag the uninstall.sh file into a terminal window and hit enter to uninstall.
- /Library/Extensions/SiLabsUSBDriver.kext
- /Library/Extensions/SiLabsUSBDriverYos.kext
- /System/Library/Extensions/SiLabsUSBDriver64.kext
- /System/Library/Extensions/SiLabsUSBDriver.kext
- Download the driver: Silabs USB communication chip driver download
- Doubleclick “Install CP210x VCP Driver.app” to install it.
- When it gives a security message, follow the instructions to allow the install to continue
Check if the USB driver are working
- If you just installed the driver, restart your computer.
- For Mac OS users: after restarting, make sure GateKeeper does not interfere with driver loading.
- If you have problems, please check out this MacOS troubleshooting page.
- If communication is possible, you should be able to select the port under: Menu > Tools > Port > ...
The name of the port may vary depending on your operating system.
- On Windows it will probably called COM* where * is a number, ie. COM4.
- On linux it will be called /dev/ttyUSB* where * is a number, ie /dev/ttyUSB0
- On MacOS it will be called /dev/cu.SLAB_USBtoUART as shown in the picture below.
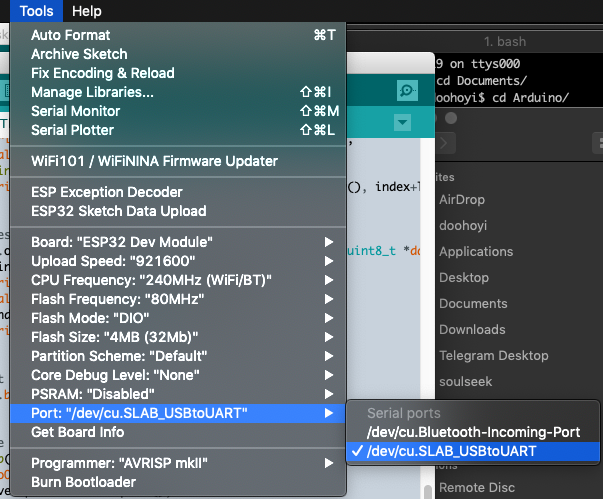 screenshot of Arduino window with menu Tools-Port-SLAB_USBtoUART selected

Install libraries
At this point you probably continue installing necessary libraries and uploading to the ESP32
Optional additional steps
Adjust ESP32 Dev Module board settings
Changing the settings below will increase the speed with which your webpages will be uploaded to the board.
Look up the board settings under > Tools > Most of these settings are correct by default, you just have to change QIO to DIO
- Board: ESP32 Dev module
- Upload Speed : 921600
- CPU Frequency : 240MHz (WiFi BT)
- Flash Frequency : 80MHz
- Flash Mode : **DIO** (is QIO by default)
- Flash Size : 4MB (32Mb)
- Partition Scheme : Default
- Core Debug Level : None
- PSRAM : Disabled

Increasing the upload capacity of the board (at your own risk)
It is possible to increase the upload capacity of the board so you can make slightly bigger websites. This is documented by Doohoyi from Dianaband, but we haven’t tried it. Proceed at your own risk!
Dianaband’s workshop documentation
Troubleshooting
We have collected various troubleshooting tips on the ESP32 Mac troubleshooting page
Acknowledgments
Is document is heavily based on the wonderful documentation of Dianaband: https://github.com/applecargo/WifiZineThrowie/blob/master/docs/index.md