Obfuscation platframe: Difference between revisions
No edit summary |
No edit summary |
||
| Line 21: | Line 21: | ||
<tool user="hackersanddesigners" repo="obfuscation" file=" | <tool user="hackersanddesigners" repo="obfuscation" file="README.md" /> | ||
[[Category:Publishing]] | [[Category:Publishing]] | ||
[[Category:Tools]] | [[Category:Tools]] | ||
Revision as of 15:45, 23 February 2022
Digital platframe
3rd Obfuscation Workshop
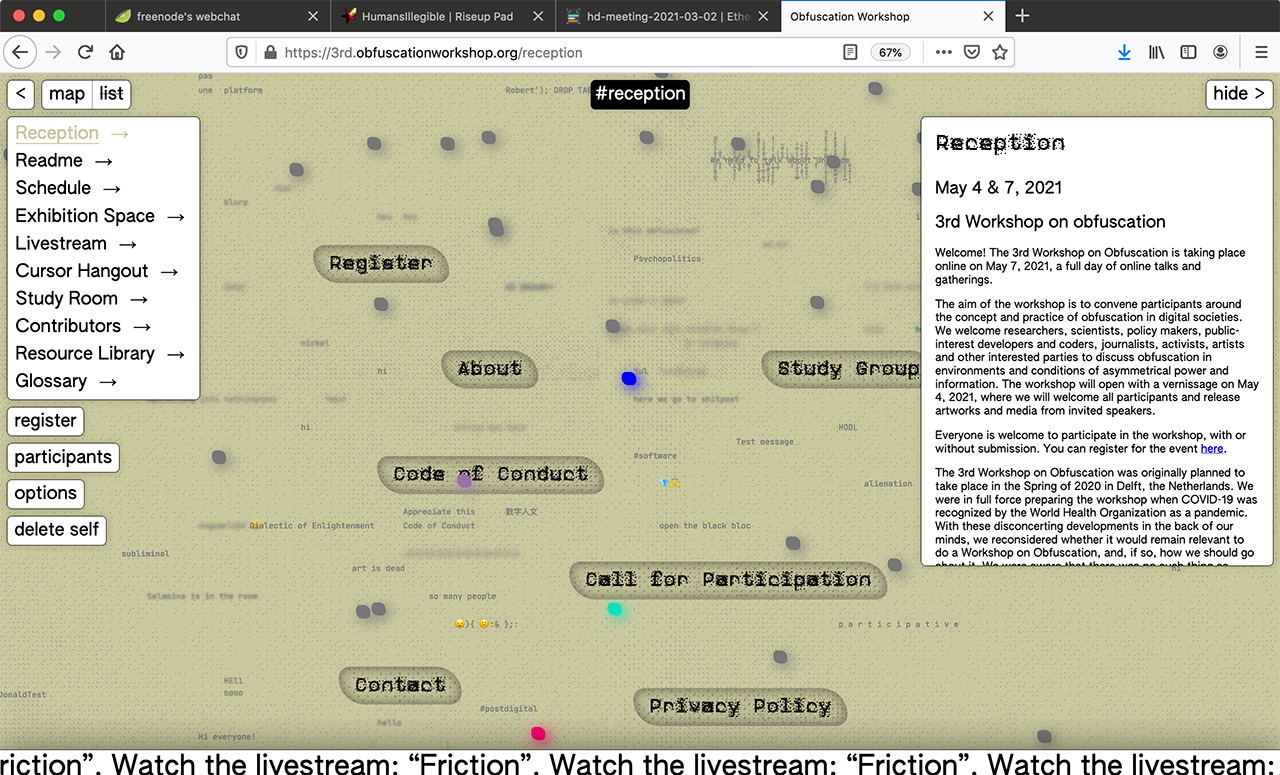
The platframe is an online tool convergence designed for the purpose of an online conference including workshops, a conference and an online exhibition. We refer to the website as a platframe rather than a platform as it converges many different tools and environments. The emphasis of difference is important here as the website attempts to make it legible to the platframe user that there are many softwares, services and frameworks used, rather than creating the illusion of an isolated whole that was built from scratch.
The platframe went through different life cycles – and facilitated different intensities of interaction. The main function of the website is a ‘spatially’ distributed chat. Platframe users can leave messages anywhere on the canvas and navigate either through the map or a list. The different ‘regions’ will become more or less active depending on the life cycle of the website.
Developed in collaboration with Karl Moubarak on the occasion of the ‘3rd Workshop on Obfuscation’. Visit and read more about how it's built 3rd.obfuscationworkshop.org/
Conference post script designed by Varia (Manetta Berends, Cristina Cochior)
Obfuscation Platframe
Website (platform, platframe, tool convergence, realm, etc...) for the 3rd Workshop on Obfuscation.
-> https://3rd.obfuscationworkshop.org/ <-

Introduction
This project brings together Strapi, VueJS, SocketIO, and some parts of Big Blue Button to leverage an obfuscated yet accessible platform for the 3rd Workshop on Obfuscation, which took place on May 4 & 7, 2021.
Project Structure
# some files ommitted

├── LICENSE
├── README.md
├── dev
│   ├── package-lock.json
│   ├── package.json
│   ├── node_modules
│   ├── back
│   │   ├── README.md               │ << Strapi, Mongoose
│   │   ├── api                     │ ( CMS & Database for static content )
│   │   ├── build                   │
│   │   ├── components              │
│   │   ├── config                  │
│   │   ├── extensions              │
│   │   ├── favicon.ico             │
│   │   ├── node_modules            │
│   │   ├── package-lock.json       │
│   │   ├── package.json            │
│   │   └── public                  │
│   ├── server
│   │   ├── index.js                │ << Express, SocketIO, Mongoose
│   │   └── models                  | ( Database for dynamic content )
│   ├── front
│   │   ├── README.md               │ << VueJS
│   │   ├── babel.config.js         │ ( Frontend framewwork )
│   │   ├── dist                    │
│   │   ├── logs                    │
│   │   ├── node_modules            │
│   │   ├── package-lock.json       │
│   │   ├── package.json            │
│   │   ├── public                  │
│   │   ├── src                     │
│   │   └── vue.config.js           │
│   └── tests
│       └── socketioload.yaml       │ << Artillery ( tests )
└── screenshot.png
Development
There needs to be several running processes.
Backend
Using Strapi to create a framework-agnostic API with a draft/publish system for static content.
First, on your local device:
cd dev/back
npm install
Then,
npm run develop
Here, you can make changes to the API, add and remove extensions, change user roles, etc... Please note, removing a property from an object could delete all the entries from the database for that object.
Then stage, commit and push your changes to your remote server.
On the remote server, the initial set up starts with the build command:
NODE_ENV=production npm run build
Then,
pm2 start "NODE_ENV=production npm run start" --name "API.OBFS" # name is optional
We are using pm2 to manage the service.
Strapi will run on http://localhost:1337.
If changes have been made and pushed to the server, re-build the admin interface if necessary, and then restart the process:
pm2 restart API.OBFS
Instructions on populating the CMS, specific to this project can be found at dev/back.
Server
Note that Strapi only handles the static content, and not the chat. For this, we create a separate Mongo database and access it in our node server scripts.
MongoDB
On your remote machine create a directory for Mongo to use as a database:
mkdir /data/obfsdb
And then, with mongod installed, start the chat database server:
pm2 start "mongod --dbpath /data/obfsdb/ --port 27018" --name DB.OBFS
Express, SocketIO, Mongoose
With mongod running, start the node server:
cd dev
pm2 start server --name OBFS
This scripts will use: - Express to serve the statically generated front-end files - SocketIO to handle real-time networking ( for the chat functions ) - Mongoose to communicate with the Mongo database dedicated only to the chat
Apache
The above scripts as well as the front-end will have some load-balancing methods implemented to prevent the server from going down. However, if you are using apache, it is set to only handle 150 active connections by default. If you are expecting to host more visitors simultaneously and your hardware can handle it, consider changing this setting or enabling the mpm_prefork module.
sudo a2enmod mpm_prefork
And then edit the mpm_prefork configuration file:
sudo nano /etc/apache2/mods-available/mpm_prefork.conf

# my configuration

<IfModule mpm_prefork_module>
  MinSpareServers           75
  MaxSpareServers           250
  ServerLimit               250
  StartServers              10
  MaxRequestWorkers         1000
  MaxConnectionsPerChild    500
</IfModule>
Frontend
Make sure to add the correct URLs and PORTS for the backend in the .env file.
Install the dependencies
cd dev/front
npm install
Serve and hot-reload for development
npm run serve
Compile and minify for production
npm run build
After building, stage, commit and push the generated dist directory to the appropriate path on your remote server.
Testing
We are using Artillery to run stress-tests on the Socket server, so make sure you have the right URL in tests/socketioload.yaml, and then run the tests:
cd dev/tests
artillery run socketioload.yaml
Reconfigure Apache and/or the load-balancing values of the server/client files accordingly.


